ASP.NET’s DataList control lets you display a list of data, but also lets you edit the entries in this list (unlike the Repeater control, for example). One thing it won’t let you do, however, is to add a new item to the list. Here’s a simple technique to do just that.
(I actually didn’t come up with this myself – I found it on the Internet. Unfortunately I didn’t keep the URL so I can’t give proper credit.)
The list portion of a DataList is a collection of DataListItem objects, each of which has an ItemType property. In addition to the types representing list entries (Item, SelectedItem, EditItem, etc.) there are the types Header and Footer. This means that the header and footer templates are part of the list, not separate from it, and controls that you place there can be accessed by the DataList events.
Let’s look at an example. In this case we’re editing a database of server information. We’ll use the DataList to add a list of applications to each server. So each DataList Item will display a single field containing the name of the application. When we edit the item, it will display a drop-down list containing all of the applications.
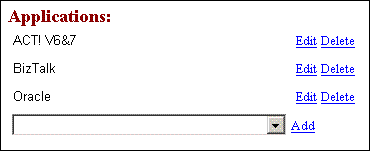
In addition, I’m going to put a drop-down list containing the same list of applications in the footer of the DataList control:

As you can see, there are link buttons on each row labeled “Edit” and “Delete”, and a link button labeled “Add” next to the drop-down list in the footer.
This Add button is the one we’re interested in. Here’s the markup defining it:
<asp:LinkButton ID="InsertButton" runat="server"_

CommandName="Insert">Add</asp:LinkButton>
The item of interest, and the one that does the work, is CommandName="Insert". As it happens, the DataList does not have an Insert command. But no worries – as I explain in this article, ASP.NET makes it easy to add our own commands.
To do this, we instruct the DataList control to let us define our own handlers for its commands by adding the OnItemCommand attribute to its definition:
<asp:DataList ID="ServerAppList" runat="server" DataSourceID="ServerAppDataSource"_

DataKeyField="ServerAppID" OnItemCommand="ServerAppList_ItemCommand">
Next we’ll need to define an event handler for ItemCommand:
Protected Sub ServerAppList_ItemCommand(ByVal sender As Object,_

ByVal e As System.Web.UI.WebControls.DataListCommandEventArgs)
I’m not going to cover each of the commands – I already went over several of them in this aforementioned article, so you can refer to that if you need some guidance. What we’re interested in here is the Insert command. Picking up inside the Select Case statement, we first get a reference to the drop-down list named AppList and extract its value:
Select Case e.CommandName
…
Case "Insert"
Dim AppListCtrl As DropDownList = e.Item.FindControl("AppList")
Dim AppName As String = AppListCtrl.SelectedValue
In this case we’re using a datasource with an InsertParameter named AppName, so next we’ll set the value of this parameter and insert the record:
      ServerAppDataSource.InsertParameters("AppName").DefaultValue = AppName

      ServerAppDataSource.Insert()
Lastly, we’ll make sure that no record is selected for editing, and bind the control:
      ServerAppList.EditItemIndex = -1

      ServerAppList.DataBind()
I’m glossing over a bit here – in order to link the new record back to the parent of the list (the server record, in this case) you’ll need to supply a foreign key to the parent record as an InsertParameter. And of course you’ll need to code the other commands. But do that, and this technique will help make a useful control even better.
Update: After looking over this, I realized I never stated exactly why you should handle this in the ItemCommand event instead of, say, in the InsertButton_Click event. The reason: in the ItemCommand event, you get the parameter e of type DataListCommandEventArgs. This parameter has a property Item that points to the row from which the command was called. Therefore you can use e.Item.FindControl to get the controls containing the values to add.
Without this parameter, finding controls in the header or footer of a DataList can be problematic. Since the header and footer are data items much like the other rows, you have to loop through DataList.Items, testing each item’s type, to find the correct row, after which you can use FindControl to get the controls you want. It’s much simpler the other way.